
Showing posts with label repurposed. Show all posts

Friday, October 12, 2012

Notes on Hubs.

~ Notes on Bike Hubs ~

You may wonder what makes our whirligigs spin.
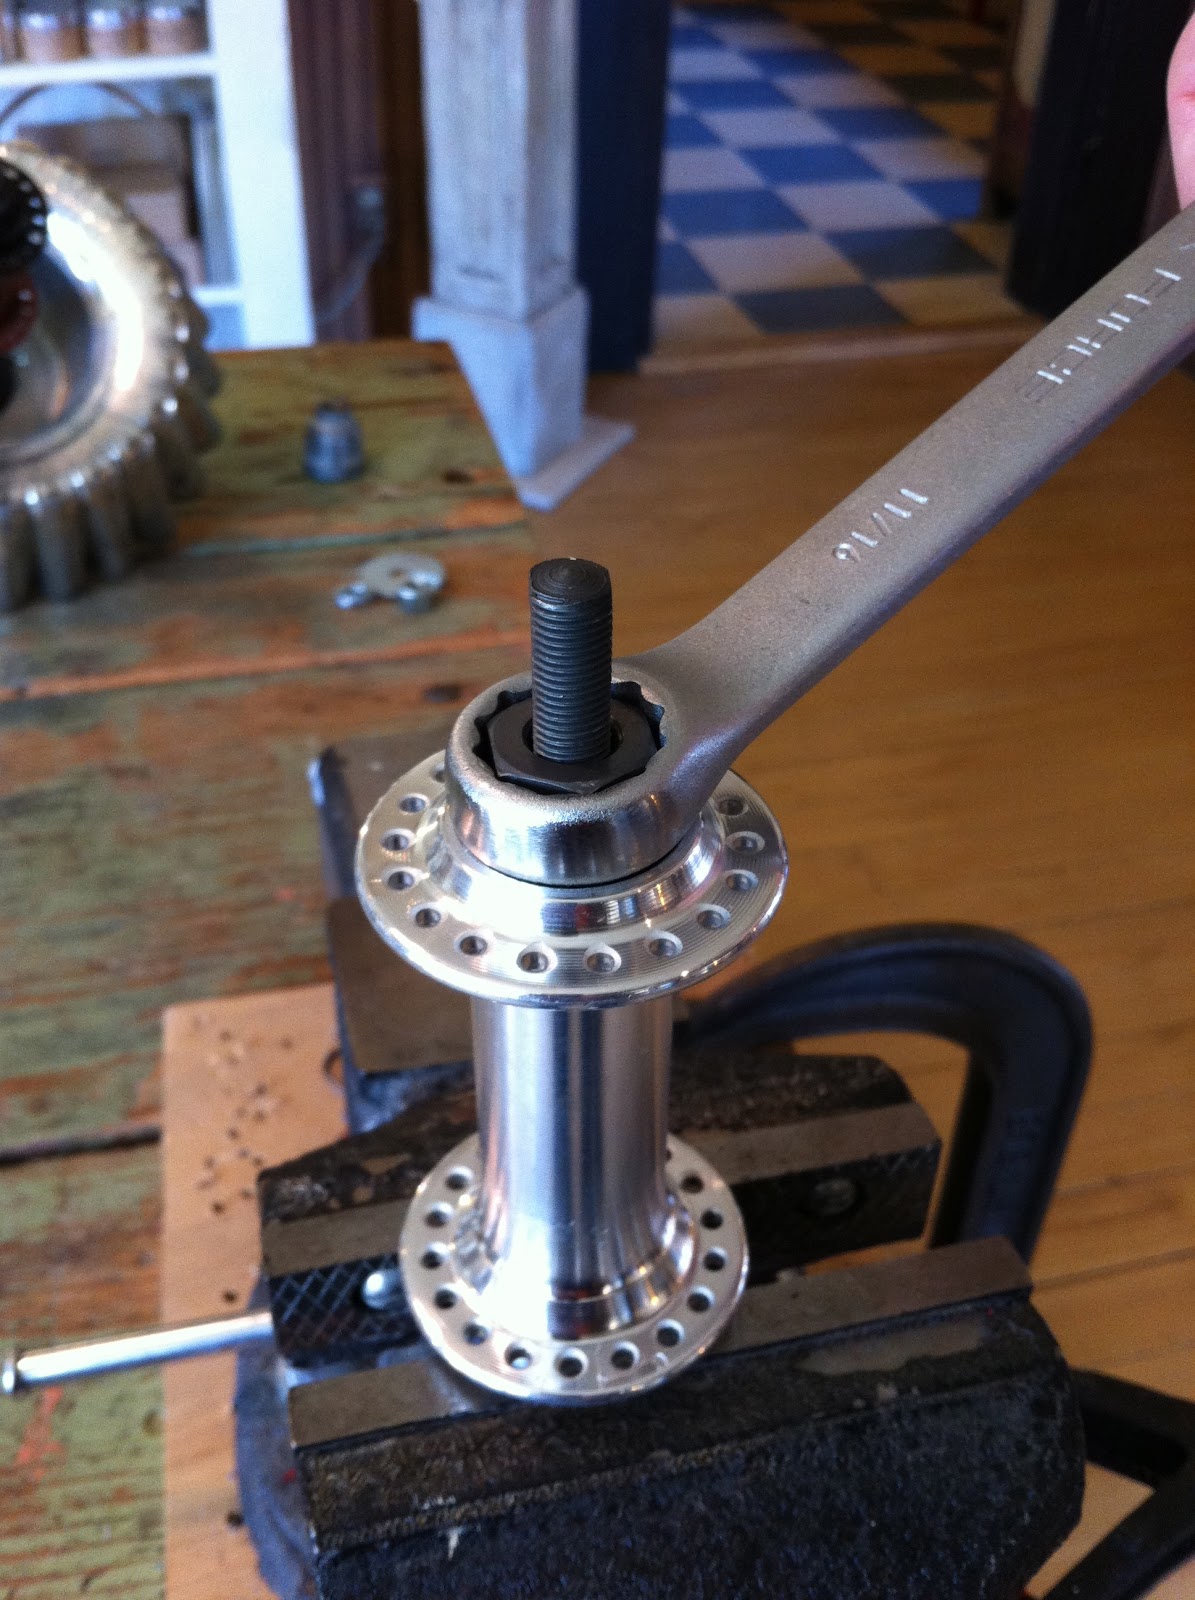
The answer is a bicycle hub.  A basic front wheel hub is designed to spin well and fast and last a good long time.  I originally repurposed old bike wheels to get their hubs, but when I began teaching workshops and needing so many so often I had to start ordering them new.  I wanted to point out that not all front hubs are the same.  TYhey all should spin and work for a whirligig but the material it's made of an it's dimensions can vary slightly. Aluminum hubs are lighter in weight than steel but this makes little difference as far as the spinning goes.  What does matter is that often a hub is tight and not smooth moving.  Hold onto one bolt end an spin with your fingers.  It should rotate smoothly and easily.


If it doesn't, it may have a little rubber dust cover over the black lock nut.  These aren'y needed for whirligig purposes and they slow down the spin.  Just pry it off with fingers or a flat head screwdriver. (see below).


Next if it still seems tight, put one ends lock nut in a table top vice clamp and with a closed end wrench on the opposite black lock nut turn gradually to the left.  As you do this, continually stop and spin the hub.  Stop  turning the wrench as soon as the hub is spinning smoothly and easily.  If you over loosen the nuts you will notice a up and down wiggle in the hub that can cause the whirligig to vibrate as it spins.  If you experience this vibration in your gig, tighten up the hub slightly.

Happy Spinning!

Sunday, September 30, 2012

The Bunny Room

~ The Bunny Room ~


A magical playland for little bunnies and kitties is what we created in the front room at Hutch.  It is the first thing you see as you enter our shop and I have to say that it lets you know what kind of experience lies ahead. A fun, childlike, and whimsical adventure.


Sometimes the bunnies are working on craft projects, sewing, cutting out paper carrots, and sometimes they are having cookies and carrot tea.  


The little bunny chairs are made of cardboard, but are sturdy enough to support bunny weight.

This cardboard dollhouse is something that I made a while ago and has been in different places in and out of the shop.  It along with a couple of vintage dollhouses add to the feeling of "play" in the room.  

Pictured below is the grand chandelier mobile which was the center and focal point of the room floating above the bunny table. 

Every time it rains, it rains, carrots from heaven.

Wednesday, March 14, 2012

Garden Club Whirligigs

~ Garden Club Whirligigs ~
The latest whirligig workshop consisted of members of the Woodinville Garden Club and we had been planning this for over a year.  I knew that they would be excited and ready to go.

And it was very true....whenever someone pre paints objects for their whirligig I know that they've been thinking and planning for a while.  Love the color!

Hustling and bustling in the studio!


Here, Cindy and I are discussing the proportions on her gig.

Adding a second hub created more height and distance between wind catchers.

They were a fun but very focused group, which is the perfect combination of both maker and whirligig.

A great whirligig needs to focus the wind's energy and be fun to look at.

I always like it when a parent and their child sign up for a workshop.  That's quality time and a great memory.

Dangling items from wire is a technique that has been utilized a few times over the years, but placing a copper tub at top and drilling random holes in the side walls to create a leaky tub effect was a workshop first. 

So many tiny little screws and washers.

Sometimes things happen in an unplanned way.  Like not being able to use a particular object because it was made of stainless steel and having to substitute a different item.  In this case the unplanned red tin added a color element to the whirligig.  I like it!


Thanks Woodinville Whirligig Team!
And a special thanks to Rebecca Love for volunteering and being the photographer that captured all these nice pictures.

Tuesday, January 3, 2012

A Special Gift

~ A Special Gift ~

Well I suffered a serious bump on the noggin today and it was due to trying to do a task too quickly.  Rush rush rush,  I was in the backyard attempting to set a post for a special whirligig that I made for my soon to be 4 year old son.  I stood up too quickly and bonked my head on his very low basketball rim.  A few hours and a few staples later I seem to be doing fine but the whirligig never got installed.  Maybe in a couple of days I will get back out there.  Anyway, here it is for you all to enjoy.  You probably guessed by now that he loves trains.


Tuesday, December 6, 2011

"Sweet Little Tweet" workshop

~ Sweet Little Tweet workshop ~

"Sweet Little Tweet" workshop- *All materials included.
This is a fun project that incorporates sculpey clay, paint, wire, and paper to create a little bird in any color you can imagine swinging sweetly in a 4 inch tall charming wire cage.
Age level- 16 and up.  
Friday, January 6th
1pm-3:30pm
cost: $30.

For more info or to sign up call Chris at hutch.

Tuesday, September 6, 2011

Recent whirligig workshop creations

~ Whirligig Creations at Hutch ~


I know that I always say that the last workshop was the greatest to date and the truth is they are all fantastic .  The whirligigs pictured above were made in the July workshop.  I'm always excited about the "stuff" that everyone brings to create their personal wind statement.  Often the funner the item the bigger the challenge but the challenge is fun and thrilling when we make it work.  These folks were into it big time.  Two of them had already planned and prepped many of the components that went on their gigs.  LOVE IT!!!

I also love getting emails from workshoppers after the class is over with questions about new gigs they are now working on.  To think that hutch may be spreading the joy of whirligigs throughout the land puts a big smile on my mug.  If any of my former workshoppers would send me a picture of themselves standing by there whirligig wherever it ended up being installed I would love to create a blog page called "As The Gig Spins".  

The next whirligig workshop is scheduled for Saturday, September 24th.   The October workshop date will be posted soon.

Tuesday, July 26, 2011

"Keeping them spinning."

~ Keeping them spinning ~
"Maintaining the old gigs at Hutch"


There are a few whirligigs (five I think) that have been on our front fence at Hutch for over 20 years.  Even though they were very well crafted they are still subjected to the elements all year round and in our climate that means a great deal of rain and wind.  They are mostly made of  light metals that even though they are partially painted will rust.  Screws will loosen and parts will fall off.   Fortunately these are easy fixes. As I watch them spin in the wind I notice if one is not keeping up I bring it in to the shop and examine it more closely.  This one pictured here is an old timer I call the "Everything Gig" and was moving slowly, so I brought it inside for a check up.  It was missing a couple of small windcatchers that I easily replaced with new ones but the problem was not as simple as that.  It was internal. I took the hub apart, cleaned the bearings and repacked it with a generous amount of grease but it still wasn't moving smoothly.  There comes a point when the metal that the ball bearings are in contact with gets rough and pitted and at that point there isn't much you can do.  It will still move, but will need a stronger wind.  The older I get the more I can relate.  One old whirligig to another.


Spin on!

Sunday, July 24, 2011

Lovin Spoon Pulls

~ Lovin Spoon Pulls ~

What can you do with all that old flatware that collects in your kitchen drawers?  Make door pulls that's what.  I'm certain this isn't an original idea and I'm not sure where I saw it for the first time but it sure is clever and fun.  It can really turn the spoon into a more decorative item and add something special to a cool cabinet door or hutch.


These "Betty Lou" spoons are very fun.  There was no question they had to be on the hutch in our little girl's room at the shop.  


This was the very first spoon handle that I made.  It was probably about a year ago when I refurbished this glass display cabinet.


These are two of the four spoon pulls on the doors of the "Hutch" hutch in our library/study room.

Large spoon pulls
$28.
to order call 360-466-2303

Medium spoon pulls
$24.
to order call 360-466-2303

Wednesday, July 20, 2011

Hanging Jars

~ Hanging Jars & Spoon Hangers ~

A fun DIY project this summer at Hutch was to put our glass source jars to good reuse and hang them from old spoons that were formed into hooks and screwed into the interior wall of our front porch.  They really stand out as you enter our shop.  I've been asked on many occasion about the species of flower.  They are an annual called Callie Orange or (Calibrachoa).  The color really looks great against the grey green of our exterior house color.  


These jars can be used inside or outside.  If outside, a covered area like our porch is ideal, because rain will accumulate in the jars (no drainage) and your plants will drown and rot.  I like to store my paint brushes in them inside the studio.  I can see them being cool candle holders as well.  The possibilities are endless.

We sell the whole set up (jar + spoon hanger) for $15. in our shop.  I think it is one of those ideas that customers see and think that they will go home and do themselves, but I think you have to think about the time, effort, and tools required to make these.  $15. is a sweet deal.

Saturday, July 16, 2011

Colander Light

 ~ Colander Light ~
Sometimes you can have an idea, create it, and later on see a similar idea made by someone else.  I've learned over the years that it is always better to then take your idea further.  It's a way of creatively pushing yourself.  Recently I picked up a magazine and discovered an article on lights made using kitchen colanders.  I had made a couple for the shop a year or so ago that seemed very similar.  HTe very next day I took down the one I had in our kitchen and began turning up the creative dial.  I added fork fringe which I had been thinking about doing but this article sealed the deal.  I also suspended it with a cool old twisted metal plant hanger from a bent spoon bracket on the ceiling.  The change was much needed.  Before it was hardly noticed and now it can't be ignored.


One of the things I like about the forks is that the light takes on almost organic jellyfish quality.  If jellyfish were made out of kitchen wares that is.  I also staggered the fork lengths to create a wavelike edge at the bottom.


In terms of function things were much improved as well.  Before it was so high up on our tall ceiling that it offered little light to a dark space.  Now it is centered right above the table and illuminates the center piece beautifully.  This light is priced at $300. Give me a call to order 360-466-2303.

Wednesday, July 6, 2011

Paper Boat Finale!

~ Paper Boat Finale ~


Once upon a time I made a boat out of recycled cardboard and scrap fabric.  Here is how the project concluded......
To tell a little story I painted words on both sides of the boat - "Once upon a bay a boy sailed away on a toy.  As the boat sailed away the boy would sing and play."


I then continued the story telling by cutting out words within the paper waves that popped up from the table.


After it was finished all that was left is to decide what to display on this display.  We made a bunch of very soft and sweet sailor bunnies that sit inside the boat as well as sail along side in their very own paper boats made from nautical charts.


I almost forgot to mention the "sail".  I coffee dyed some very sheer cotton fabric and stitched it to narrow strips of cardboard leaving the edges very rough.  After tearing a few holes I patched them with pieces of scrap fabric and stamped anchors and boat wheels on them.  To attach the sail I used the wires that suspend the boat over the table.  I'm not sure if these pictures do the reality justice so if you want to experience this elaborate tabletop display in person you will just have to pay us a visit at Hutch soon. 

Saturday, June 18, 2011

Boat Project Continued

~ Paper Boat ~

If you have been following the progress of the boat project at hutch, we last left off waiting for a sail for the little old wooden boat I repainted.  Well when the sail arrived, attached to the boat and placed in the room it was enormous.  Almost reaching the ceiling and blocking a great deal of light into the room it just wasn't going to work in the space.  A second plan of a wooden rocker crib shaped like a boat didn't work either.  What do I turn to in an emergency......CARDBOARD!  I began to pull out any big old boxes I could find, fired up the trusty glue gun and began to cut.


I have to say I never built a boat before.  As a child I was more of a car guy, but being from Rhode Island "The Ocean State" where there are more boats than cars, and helping my grandfather every 4 years refinish the boat that never left his yard gave me an advantage visualizing this task.  Here is the bottom with ribs attached.


 Next I began to cut strips and attaching them to the sides.  This is when the boat really started to take shape.


Adding small details at the bow and stern was a little bit of a nod to movie director Tim Burton who always has had a thing for the spiral.  Also the boat would be zigging and zagging without a sturdy rudder.


Slapping a fresh coat of paint on the cardboard brought the vessel to life.  Trimming in aqua and red and of course drenching it in a bath of coffee completed the basic boat.  What's left you ask?  I think I'll add some words to the aqua trim, float it over a paper sea, and make tattered sails to catch the hutch winds.

Saturday, March 19, 2011

Another Whirl

"Another Whirl"

A little less than a year ago I constructed this whirligig using a few old metal toys. I suspended the toys below using bicycle spokes that I collect when removing hubs from rims.  After putting it outside on our fence and watching the upper course of cans struggle to rotate in a good wind I realized that there was just too much weight on the perimeter.  I brought the whirligig into the studio a little while ago and I've been slowly redesigning it.  I just finished and put it out to spin this morning.


The new design is horizontal which fits the space under our sign better and I moved the lower toys to a separate hub and rim making it a double rotating gig.  I also spruced it up with a bit of paint.  I can't wait for the next really breezy day to see it fly like the wind.  It is for sale.  Give me a ring #360-466-2303 

Monday, March 14, 2011

Project Update.

The Bunny Shed is being painted, and I'm hoping to have something fun happening inside.  An illuminated scene perhaps.  What do you think you might see if you peeked into a bunny shed?
Related Posts Plugin for WordPress, Blogger...